I've just finished my latest video and thought I would give a few details (ok, it turned into quite a few details) as to how it was created. The finished result is below.
Intro
There are several different elements that came into play to create the finished result:
- Fracture the original object
- Use the game engine to get physics (by recording game engine to frames)
- Use a particle system for the smaller shards
- Manipulate keyframes to create reversing effect
- Control the particle system so that it pauses and then 'reverses' (it merely gives the impression of reversing)
- Using the compositor for the final look, including motion blur, depth of field etc.
Materials
The first thing I quickly decided on was the fact that I wanted to use the classic Suzanne model in blender as the focus was the effect and not the modelling. Secondly I knew that I wanted the material to make it look like a jewel and luckily I had the perfect HDRI image for creating this effect courtesy of http://ict.debevec.org/~debevec/Probes/ (I used the Grace Cathedral).
Game Engine
The second part and one of the main points of the video is the actual shatter effect. After a quick scope out of the various posts on Blender Artists looking for a suitable script I foolishly realised that Blender already comes packaged with a fracture script and I started playing around with the settings to get a good result.
Having made several attempts to create the shatter effect by using a particle system I realised that my only option was to use the game engine (not one I wanted to resort to as my ATI graphics card has issues when using the game engine). Knowing that I would be using the rigid body features of the game engine I set the monkey model to be a rigid body with a 'Convex Hull' collision bounds type before using the fracture script. When the fracture script runs it keeps any properties the single object had and copies them to the individual shards that are created, so it makes sense to choose any settings before fracturing.
Now I knew that I could do the smaller shards with a particle system and it takes a bit of pressure off the game engine as although it can handle hundreds of objects it can be a difficult to control them, so a particle system it was to be (I'll get on to the particles a bit later, this just explains that only the main shards are controlled by the game engine). This meant that there would be relatively few shards created by the actual script, in the end I opted for 20 shards to be created (once enabled script appears in search menu, press T after running the script to see the options) as I wanted them to stay quite bulky.
I wasn't quite sure how to get an explosion to work but when I ran the game engine as a test the objects exploded simply because that's what happens when the objects are too close together in the game engine, it treats it as a collision. So problem solved, almost. I turned the gravity property in the scene settings tab to 0 so that the shards would continue to fly outwards, but there seemed to be quite a few that flew downwards anyway due to their collisions. Because I wanted a more spherical explosion I created a small static object that was placed in the monkey head which would cause a bit of an extra collision (below).
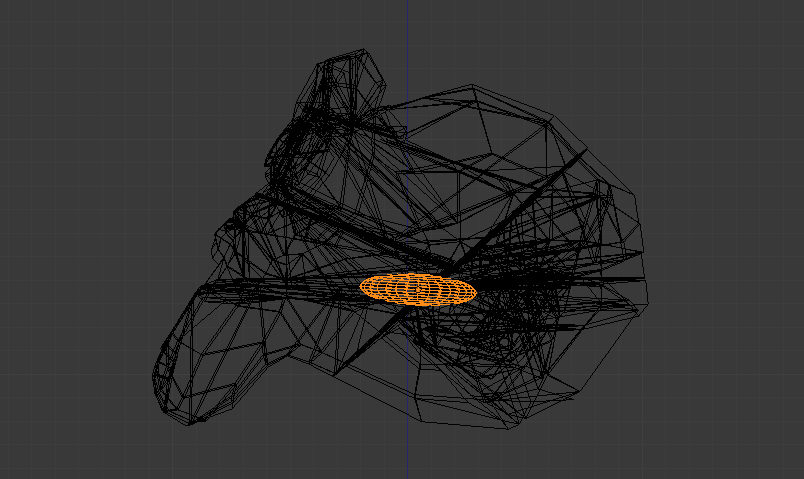
The intersecting squashed sphere causes a slightly different explosion.
Logic
This worked technique (previous section), but to enhance the effect I animated the scale of the object to increase in a couple of frames while still intersecting with the monkey head. To get this animation to work in the game engine I set up a few logic bricks (not something I'm familiar with, so although it did the job it's possibly not the best way to do it) shown below.
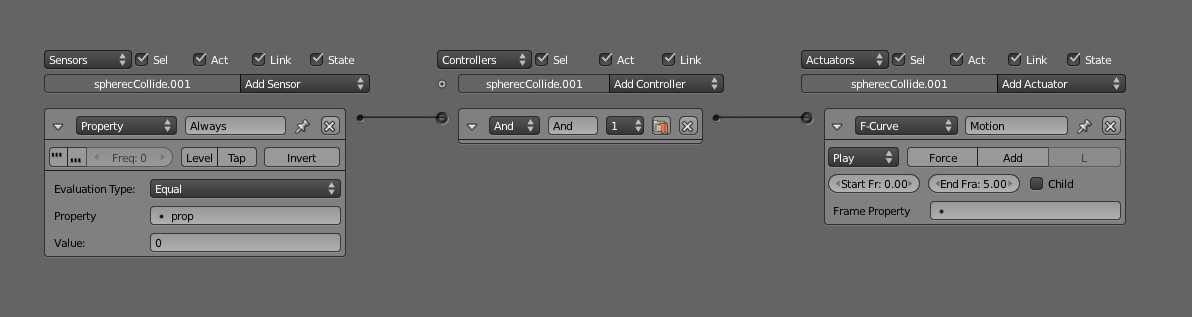
Game logic to allow the sphere to expand in the game engine, click for larger image.
I set up a game property (press N in the logic window to bring up the property window) with a default value and then set the sensor to listen for when that property was zero. But seeing as the property was already zero it set off as soon as the game loaded, which is exactly what I wanted. The sensor is connected to an FCurve Actuator which is how the scale animation is loaded into the game engine.
After all this was set up I set up the game engine to 'Record frames' from the Game menu so that after running the game I could manipulate the keyframes of the objects in the time line.
Particles
Having created the main shard explosion I now wanted to create the smaller particles that would act as tiny shards. To do this I created several different objects that would act as my custom shards and grouped them (shown below).
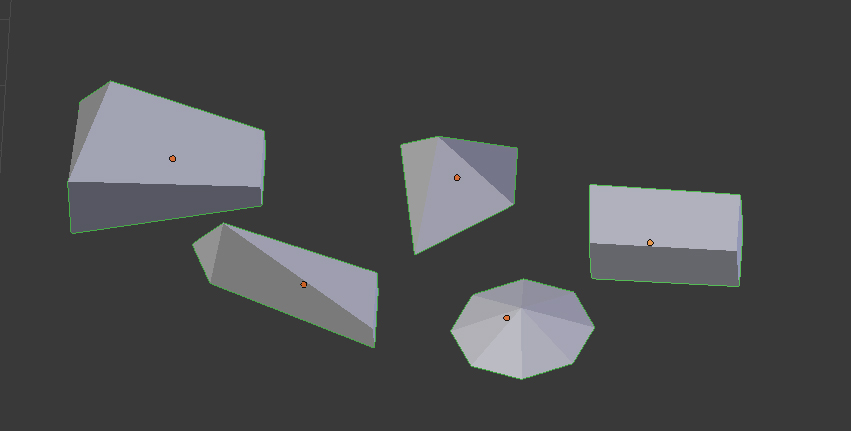
Group the custom shards to use them in the particle settings.
I then went into the render settings section of the particles tab (I applied a particle system to a sphere) and chose 'Group' and plugged in the name of the group of custom shards I had made, I also checked 'Pick Random' (shown right).
What these settings do, for those that perhaps haven't used them before is to replace every particle emitted with a piece of geometry from the group we just plugged in. 'Pick Random' simply says to randomly choose 1 of the pieces of geometry from the group when emitting a particle. I also turned off the emitter check box which is also in the screen shot to the right to make sure that the sphere that the particle system was applied to didn't show up when rendering.

Render settings for the particles.
I wont totally go into all the settings for the particles but a major point is to turn off gravity completely in the 'force field weights' section of the particles tab, allowing the particles to continue to fly outwards like the bigger game engine shards.
The Reverse
We now have all the shards that we need and we just have to get all the shards (both particle and game engine ones) to pause and then reverse back into the monkey head. I considered just reversing the image sequence once rendered but I thought this would be a bit obvious and I also wanted to have a different camera move on the reverse part of the animation.
All the game engine shards are easy to reverse as they have keyframes. I selected the objects and opened up the 'Dope Sheet'. I then selected a point that I wanted the shards to stop expanding at and deleted all keyframes after that (press B to box select groups of keyframes at a time). To get the reverse effect and pause you have to select all of the keyframes and duplicate the whole section for all the shards and move them along the time line leaving a 50 frame gap between the first lot of keyframes and the new duplicated ones (same controls as in 3D view, so Shift+D to duplicate and G to move). Click to confirm their place and move the timeline marker (the green vertical line) to the centre of the duplicated group of keyframes.
Select the duplicated frames and press S and then type -1(minus one), this reverses the block of duplicated frames, the timeline marker was important as when you scale keyframes Blender uses the timeline marker as the centre point for the scaling operation. You should have something like the image below except for all the shard pieces.

The orange bar shows that there is no change between those keys and creates the pause effect.
The shards should now animate outwards, pause, and then reverse back together to create the monkey head. the orange bar in the image above shows that there is no change between the 2 keyframes that end and start the blocks of keyframes, creating the pause.
To create the pause effect for the particles was a bit difficult to figure out, but quite easy to implement once I realised what settings needed to be changed. The main thing that will stop the particles in their tracks is the dampening value on the physics section of the particles settings. This will need to be an animated value (hover cursor over and press I - i not L).
To reverse the particles I created another sphere and placed it over the sphere that has the particle system applied to it. This new sphere will be the forced field that drags the particles back to the centre whether they like it or not. Set it to be a force field in the physics panel, the only settings that have to change is the strength which will have to be a negative number to bring the particles back in. The strength value will have to be animated from 0 to whatever strength you want (I set it to -0.150) and be in time with when the keyframed shards start to reverse.
This new sphere also has to be a collision object so that once the particles are dragged back in they are killed, so set the object to be a collision object in the same place you set it to be a force field and check the box that says 'kill particles'.
You may find that when the particles are meant to be paused by the dampening value that they continue to spin, I found that I had to set the initial rotation for the particles to be 'none' and then animate the 'spin' value to control the spin of the particles.
That effectively concludes all the elements that make up the shot apart from the camera move, which is up to you. To get a similar lighting effect the next section is about the compositor.
The Compositor
I'm not going to explain the whole compositing process as you can get a lot from the image below, but I will just add a few things worth noting:
- To get the speed value for the vector blur to appear you have to make sure that 'Vector' is checked to render in the 'layers' section of the render tab.
- Because I didn't want the HDRI map to appear in the background of the render I created another scene and used the background from that. You have to set alpha to be 'premultiplied' in the shading section of the render tab of the main scene to allow the background to be transparent. But this depends on whether you use an HDRI map at all.
View of compositor nodes, click for larger view.
End
Phew! That was longer than expected, hope someone finds it useful.
Ray.